English
Chandelier Lift Installation Guide for Tall Ceilings
April 21, 2026
Installing a chandelier in a foyer or ballroom with ceilings exceeding 15 feet creates a stunning visual impact, but it also creates a maintenance challenge. A chandelier motorized lift system is the industry-standard solution. This guide outlines the essential steps for a safe and professional installation.
1. Pre-Installation Planning: Capacity & Clearance
Before purchasing or installing a lift, you must align the machine’s specifications with your fixture’s requirements.
- Weight Verification: Always choose a lift with a capacity at least 20% higher than the total weight of your chandelier (including bulbs and decorative glass).
- Ceiling Structure: Ensure the mounting location has adequate structural support (joists or steel beams) to handle the “dead load” of the lift and the fixture.
- Winch Clearance: Measure the attic space or the “false ceiling” depth. The lift motor (winch) requires a clear area for housing and cable movement.
2. Technical Installation Parameters
Refer to this technical table to determine the appropriate system for your ceiling height and fixture weight.
Chandelier Lift Selection Matrix
| Ceiling Height (ft/m) | Typical Winch Model | Cable Length Required | Motor Power | Ideal Application |
| 12ft – 18ft (4-5m) | Standard Compact | 25ft / 7.6m | 0.5 HP | Residential Foyers |
| 20ft – 35ft (6-10m) | Mid-Range Heavy | 50ft / 15m | 1.0 HP | Grand Staircases |
| 40ft+ (12m+) | Industrial Power | 65ft+ / 20m+ | 1.5 HP+ | Hotel Lobbies / Ballrooms |
3. Step-by-Step Installation Process
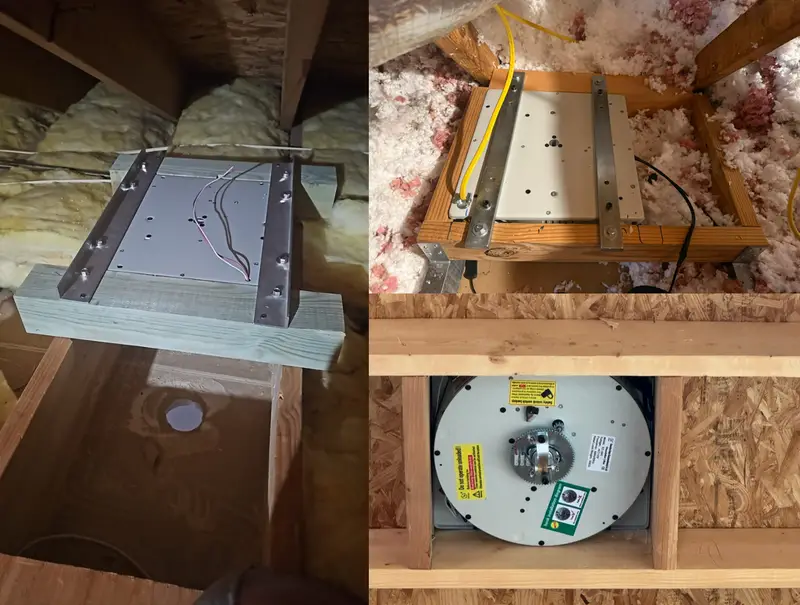
Step 1: Mounting the Motorized Winch
The winch assembly must be bolted directly to a structural member. Use heavy-duty lag bolts or a custom steel mounting plate. The unit must be perfectly level to ensure the cable winds smoothly without overlapping or fraying.
Step 2: Routing the Cable and Wiring
The lift cable descends through a small hole in the ceiling (the “ceiling canopy”). The electrical wiring for the chandelier runs alongside or through the lifting cable.
- Pro Tip: Use a contact plate system. This allows the chandelier to disconnect from power automatically as it lowers and reconnect securely when it is locked back into the ceiling.
Step 3: Setting the Limit Switches
This is the most critical safety step. Limit switches tell the motor when to stop.
- Upper Limit: Prevents the fixture from crashing into the ceiling.
- Lower Limit: Ensures the chandelier stops at a safe, reachable height (usually 3–4 feet off the floor) for cleaning and bulb replacement.
Step 4: Load Testing
Before hanging the actual chandelier, test the lift with a “dummy load” of equivalent weight. Cycle the lift up and down three times to check for cable tension and motor smoothness.
4. Safety & Compliance Standards
For professional B2B and luxury residential projects, compliance is non-negotiable.
- Safety Braking: Ensure the lift has an automatic mechanical brake that locks the cable in place in the event of a power failure.
- Key-Switch Operation: To prevent unauthorized use (especially in commercial settings), the lift should be operated by a keyed wall switch or a secure digital code.
Why Choose Hontrix for High-Altitude Solutions?
At Hontrix, we specialize in the hardware required to manage grand-scale decorations and lighting. From our expertise in Giant Commercial Wreaths to high-capacity lifting systems, we provide the “industrial power” reliability required for luxury environments.
Planning a high-ceiling lighting project? Explore our professional high bay lift or consult with our technical team for Custom Support on your next installation.