Englisch
Anleitung zur Montage von Kronleuchtern: Holzbalken vs. Beton
9. Juni 2026
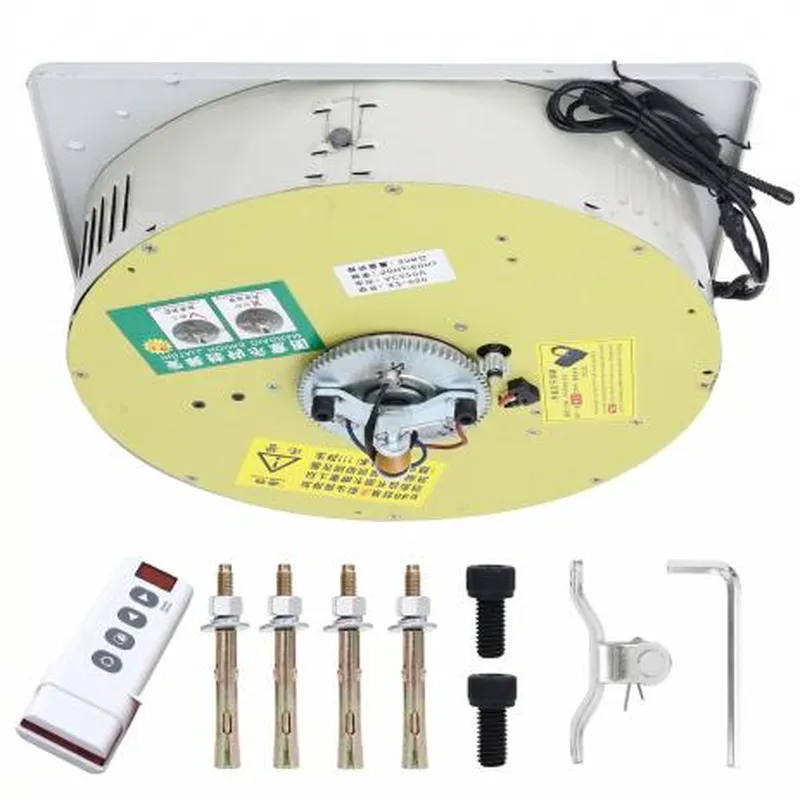
If you are specifying or installing a motorisierter Kronleuchterlift, the single most important variable is the ceiling structure. This comprehensive guide covers the two primary mounting scenarios — concrete and wood joist — with practical installation details for each to ensure long-term structural integrity and operational safety.
Structural Requirements: Concrete vs Wood Joist
| Technische Parameter | Concrete Ceiling Installation | Wood Joist Ceiling Installation |
| Primäre Befestigungselemente | M12 Expansion Bolts (Depth 80 mm Minimum) | Structural Lag Screws / Steel Support Bars |
| Structural Challenge | Rebar Evasion & Tension Loading Verification | Standard 16-Inch Joist Cavity Interference |
| Ideal Project Stage | Pre-Cast or Finished Commercial/Residential | Solution A: New Construction / Solution B: Retrofit |
| Clearance Requirements | 300 mm Above Unit For Heat Dissipation | Solution B: 6 Inches Below-Ceiling Clearance |
Concrete Ceiling Installation
Concrete is the more straightforward mounting surface, common in multi-story residential and commercial construction across Asia, Europe, and the Middle East.
The Installation Process
- Locate Mounting Position: Mark the precise center point where the chandelier will hang.
- Scan For Rebar: Use a rebar detector to avoid drilling into structural reinforcement steel.
- Drill Anchor Holes: Prepare holes for four M12 expansion bolts with a depth of 80 mm minimum.
- Secure Mounting Plate: Torque anchors to manufacturer specification (typically 40 to 50 Nm).
- Mount Lift Unit: Attach the lift body to the mounting plate using the integrated bracket system.
- Electrical Connection: Run dedicated power to the junction box on the lift unit.
Key Performance Considerations
- Ensure a minimum concrete thickness of 120 mm at the designated mounting point.
- Expansion bolts must be explicitly rated for overhead (tension) loading, not just lateral shear forces.
- Allow a minimum of 300 mm clearance above the lift unit to ensure proper heat dissipation.
- Total installation time averages approximately 2 hours for an experienced installer.
Wood Joist Ceiling Installation
Wood joist construction dominates North American residential building. The standard spacing is 16 inches on center (406 mm), which creates a 14.5-inch (368 mm) structural cavity between the joists.
The Structural Dimension Challenge
The standard Hontrix chandelier lift unit is 14.7 inches (373 mm) wide. This creates a 5 mm interference with the standard joist cavity—a deliberate engineering choice that prioritizes internal component spacing and robust cable management over fitting between joists without modification. To resolve this, choose one of the following two approved technical solutions:
Solution A: Between-Joist Installation (New Construction / Major Renovation)
- Notch The Joists: Remove approximately 3 mm from each adjacent joist face at the exact mounting location.
- Reinforce With Blocking: Install solid blocking between joists on both sides of the notch to restore full structural integrity.
- Install Steel Support Bars: Use the pre-drilled steel bars provided by Hontrix that span across 2 to 3 joist bays.
- Mount The Lift: Attach the heavy-duty lift mounting plate securely to the steel support bars.
- Electrical Rough-In: Run the required power cables before final drywall installation.
Solution B: Below-Joist Installation (Retrofit / Finished Ceilings)
- Install Steel Support Bars: Mount the support bars directly to the underside of the wood joists, requiring no cutting or structural modification.
- Mount The Lift: Attach the unit to the support bars directly through the finished drywall ceiling.
- Install Decorative Cover: Utilize the standard Hontrix decorative trim kit to conceal the lift body and mounting hardware. The architectural trim cover is available in white, black, or custom finishes.
Key Performance Considerations
- Solution B requires approximately 6 inches of below-ceiling vertical clearance for the decorative cover.
- The decorative cover should be specified early in the project design phase as it becomes a visible architectural element.
- If your joist spacing is non-standard (such as 24-inch on center), contact the manufacturer directly for custom support bar dimensions.
Sloped Ceiling Adaptations
For vaulted, cathedral, or pitched ceilings, the motorisierter Kronleuchterlift must operate on a perfectly level plane regardless of the exterior ceiling angle:
- Pendant Extension Rods: Threaded steel rods offset the mounting point to create a perfectly level surface beneath the sloped ceiling structure.
- Custom Steel Framework: For extreme architectural angles or high-tonnage loads, a custom-fabricated steel sub-frame provides a level, stabilized mounting platform.
Critical Safety Rule: Perpendicular Alignment
The lift cable must exit perpendicular to the unit at all times. Any installation angle introduces lateral friction force that severely accelerates wear on the cable guide, wire rope, and internal drum mechanisms.
Load Verification Before Every Installation
Regardless of your chosen ceiling mounting configuration, installation teams must verify the following safety metrics before final sign-off:
- Sicherheitsfaktor: Confirm that the structural mounting surface can support 4x the rated load of the lift (the required safety factor for dynamic loading conditions).
- Fastener Torque: Double-check that all mechanical fasteners, lag screws, and anchors are tightened to exact engineering specifications.
- Cycle Testing: Operate the chandelier winch installation through a full up and down mechanical cycle with the actual chandelier weight attached before installing the final decorative trim.
Technical Support & Engineering Consultations
Hontrix provides project-specific structural mounting calculations and can review your architectural installation plans before site work begins. Contact our engineering team with your specific ceiling type, joist spacing measurements, and chandelier specifications for a custom mounting recommendation.
- E-Mail: info@hontrix.com
- WhatsApp: +86 18259566684